4.6. Ribbon Menu
XenaManager incorporates a modern ribbon menu, akin to applications like Microsoft Word. Here, we provide explanations for each of the submenu items.
4.6.1. Edit Menu

Fig. 4.17 Edit menu
This menu houses essential editing functions, and their availability depends on the context of your selection in the Available Resources tree view. Each function is explained in detail in other sections of this manual, and further explanations are not provided on this page.
4.6.2. Operations Menu

Fig. 4.18 Operations menu
This menu hosts functions capable of executing more intricate operations on one or multiple resources.
Release All My Resources
This button will release all the resources, including chassis, modules, and ports, that have been reserved by you. It provides a convenient way to clean up your reservations, especially when dealing with a large number of chassis, modules, and/or ports, without having to manually release each one individually through the Available Resources tree view.
Reset Used Port
This button will restore all test bed ports that you have reserved to their default settings.
Relinquish Chassis Resources
This button will relinquish all resources on the selected chassis that have been reserved by any user.
Import XM-1G Testbed
By clicking this button, you can import a legacy XenaManager testbed definition. All you need to do is click the button and choose the testbed file you’ve previously exported from the legacy XenaManager. This action will generate a new XenaManager testbed, incorporating the definitions from the legacy definition.
See also
XenaManager is the earlier software that has now been succeeded by XenaManager.
Load Test Case
This button allows you to load settings from a XenaManager test case file.
Save Test Case
This button allows you to save the complete port configurations for all ports in your current testbed.
Import XI LogCfg
This button allows you to import XenaIntegrator logging configuration.
DHCP Client
This button allows you to activate the DHCP client for a single selected port.
Pair Streams
This operation works on two streams that are defined on different ports. To perform this operation, you need to select the two streams in the Available Resources tree view.
When invoked, this operation will ensure that certain fields in the defined packet headers for each of the two streams point to the other stream as follows:
Ethernet segment: The DMAC Address field will be set to the MAC address of the peer port.
IPv4/IPv6 segment: The Destination IP Address field will be set to the defined IP address for the peer port.
This configuration ensures that when traffic is initiated, the traffic from one port will effectively reach the other port. For IP traffic, it’s important to note that if the two ports are located on different IP subnetworks, you may need to resolve the IP gateway MAC address using ARP for proper communication.
Preview Port Traffic
This operation allows you to preview the actual packets that will be sent on a port before initiating a test. To utilize this function, you need to select a port stream in the Available Resources tree view.
When invoked, this operation will perform the following actions:
Stop traffic on the port if it is currently active.
Set the port in Tx(off)-to-Rx loopback mode.
Setup and start capture on the port itself.
Start traffic on the port.
Let the traffic run until the capture buffer runs full. The traffic will also be stopped after 10 seconds if the buffer is still not full.
Collect the captured packets and save them to a temporary file.
Restore the saved port and stream settings.
If Wireshark is installed on your system, it will be launched to view the captured packets when you use this feature. However, if Wireshark is not installed, you will need to utilize the Capture panel within the application to inspect the packets.
Preview Stream
This operation allows you to preview the actual packets that will be sent on a stream before initiating a test. This feature is particularly valuable if you have applied one or more modifiers to the stream and want to verify that the resulting packets appear as expected.
The function require that you select a single stream in the Available Resources tree view.
When invoked, this operation will perform the following actions:
Stop traffic on the port if it is currently active.
Disable all other streams on the port after saving their initial state.
Set the port in Tx(off)-to-Rx loopback mode.
Setup and start capture on the port itself.
Start traffic on the port.
Let the traffic run until the capture buffer runs full. The traffic will also be stopped after 10 seconds if the buffer is still not full.
Collect the captured packets and save them to a temporary file.
Restore the saved port and stream settings.
If Wireshark is installed on your system, it will be launched to view the captured packets when you use this feature. However, if Wireshark is not installed, you will need to utilize the Capture panel within the application to inspect the packets.
4.6.3. View Menu

Fig. 4.19 View menu
This menu contains functions that affect the visual appearance of the application.
Panel Layout
Checking the Freeze Layout checkbox disables the ability to show or hide panels and to drag panels to other docking positions or to make them float-able. You can use this to protect yourself against unintended changes.
Clicking the Set Panel Visibility button will open a dialog that allows you to control the visibility for each of the function panel tabs available in the application. You can also hide any of the panels by selecting it and then clicking the little “X” to the right of the tab panel header as shown in the adjacent example. To bring the panel back you can use the above mentioned dialog and click the checkbox next to the name of the hidden panel.
When you make changes to the layout the new layout will be restored when you startup the application again. The Reset Layout to Default button will delete the saved layout. The next time you start the application the original layout will thus be restored.
Application Theme
Select the layout theme for XenaManager from the menu.
Available Resource Settings
If you check the Module description as label option, the module description label will be used to name the module entries in the resource tree view instead of using the default module number identification.
If you check the Port description as label option, the port description label will be used to name the port entries in the resource tree view instead of using the default port number identification.
If you check the Stream description as label option, the stream description label will be used to name the stream entries in the resource tree view instead of using the default module/port number identification.
Stream View Settings
When defining MAC addresses in the Stream Packet Header Definitions panel, you can limit the list of selectable MAC addresses to those belonging to ports marked as used by checking Only MAC for used ports.
Debug Settings
This section contains settings intended for advanced users. The Show SW Upgrade Controls will unlock the manual software upgrade control in the chassis and module properties. This is as indicated only recommended for advanced users who fully understand what they are doing.
4.6.4. Options Menu

Fig. 4.20 Options menu
This menu contains various functions that affect the behavior of the application.
Set Username
The default username for the application is your Windows username. You can change this with this function.
Open Last Configuration as Start
If this option is checked the configuration file that was active when you closed down the application the last time will automatically be re-opened on the next application start.
Ask Before Relinquishing Ports
If this option is checked you will be asked to confirm if you really want to relinquish ports reserved by other users. This is also the recommended setting.
Calculate UDP Checksum
For modules not supporting automatic UDP checksum calculation: Attempt to calculate UDP checksums based on a static header with all-zero payload and no TPLD.
Sync Start in Global Stats
If this option is checked the Start button in the Global Statistics panel will use a synchronized port start mechanism for the ports if the chassis firmware version supports this feature.
Decode Xena TPLD
When this box is checked the XenaManager capture function will attempt to decode and show the Xena TPLD in captured packets.
Save Ethernet FCS
When this box is checked the XenaManager capture function will save Ethernet FCS when generating PCAP files.
Save Selected Sort Order
Saves the Chassis Sort Order defined for the Available Resources tree. The saved Selected Sort Order will be used when the XenaManager is re-launched.
Rearrange Chassis Tree Info
When this box is checked the chassis information in the Available Resources tree will be shown, starting with the selected Chassis Sort Order criteria.
4.6.5. Tools Menu

Fig. 4.21 Tools menu
This menu contains various shortcuts to other tools.
Xena Test Applications
This section will show an icon for each of the other Xena test applications installed together with the XenaManager, Xena2544, Xena2889, Xena3918, and Xena1564. You can launch each of these applications by pressing the icon button.
Support
If you click the Generate Support Archive button the application will create a compressed ZIP archive containing both the currently loaded configuration file and the content of the Logs and Settings directories. This file can then be emailed to your support representative.
Clicking the Explore Xena Data Directory will open a Windows Explorer in the data directory for the XenaManager. Here you can find configuration and settings files, log files and any support archive files you may have created.
4.6.6. Minimizing Ribbon
The ribbon menu will by default be shown fully expanded. In order to free up screen space you can minimize it by clicking the arrow next to the Help icon in the menu title line as shown below.

Fig. 4.22 Minimize ribbon using arrow icon
You can also use the little arrow in the Quick Menu strip as shown below.
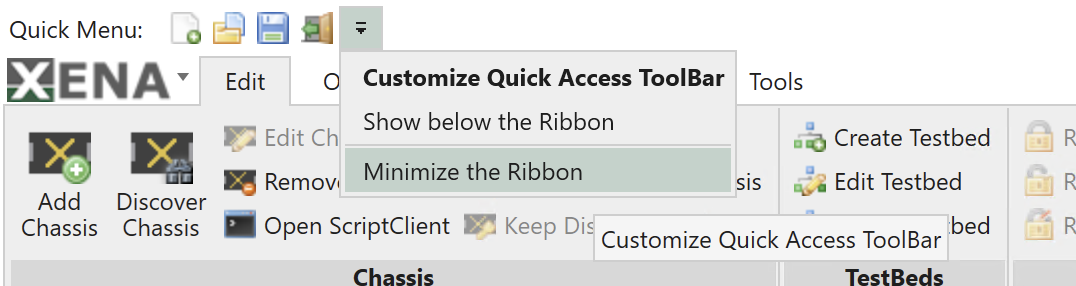
Fig. 4.23 Minimize ribbon using quick menua