11. Protocol Segment Profile Panel
This sub-panel defines the protocol segments used for the multicast traffic generated by the source port. You can add, remove and rearrange segments as you please.
Note the following default field assignments:
The Ethernet Source MAC address will be set to the MAC address of the port.
The Ethernet Destination MAC address will be set to the multicast MAC address according to RFC 1112, section 6.4.
The Source IP address will be set to the address specified for the port.
The Destination IP address will be set to the multicast group address.
11.1. Available Profiles List
The list view at the top show all defined profiles.
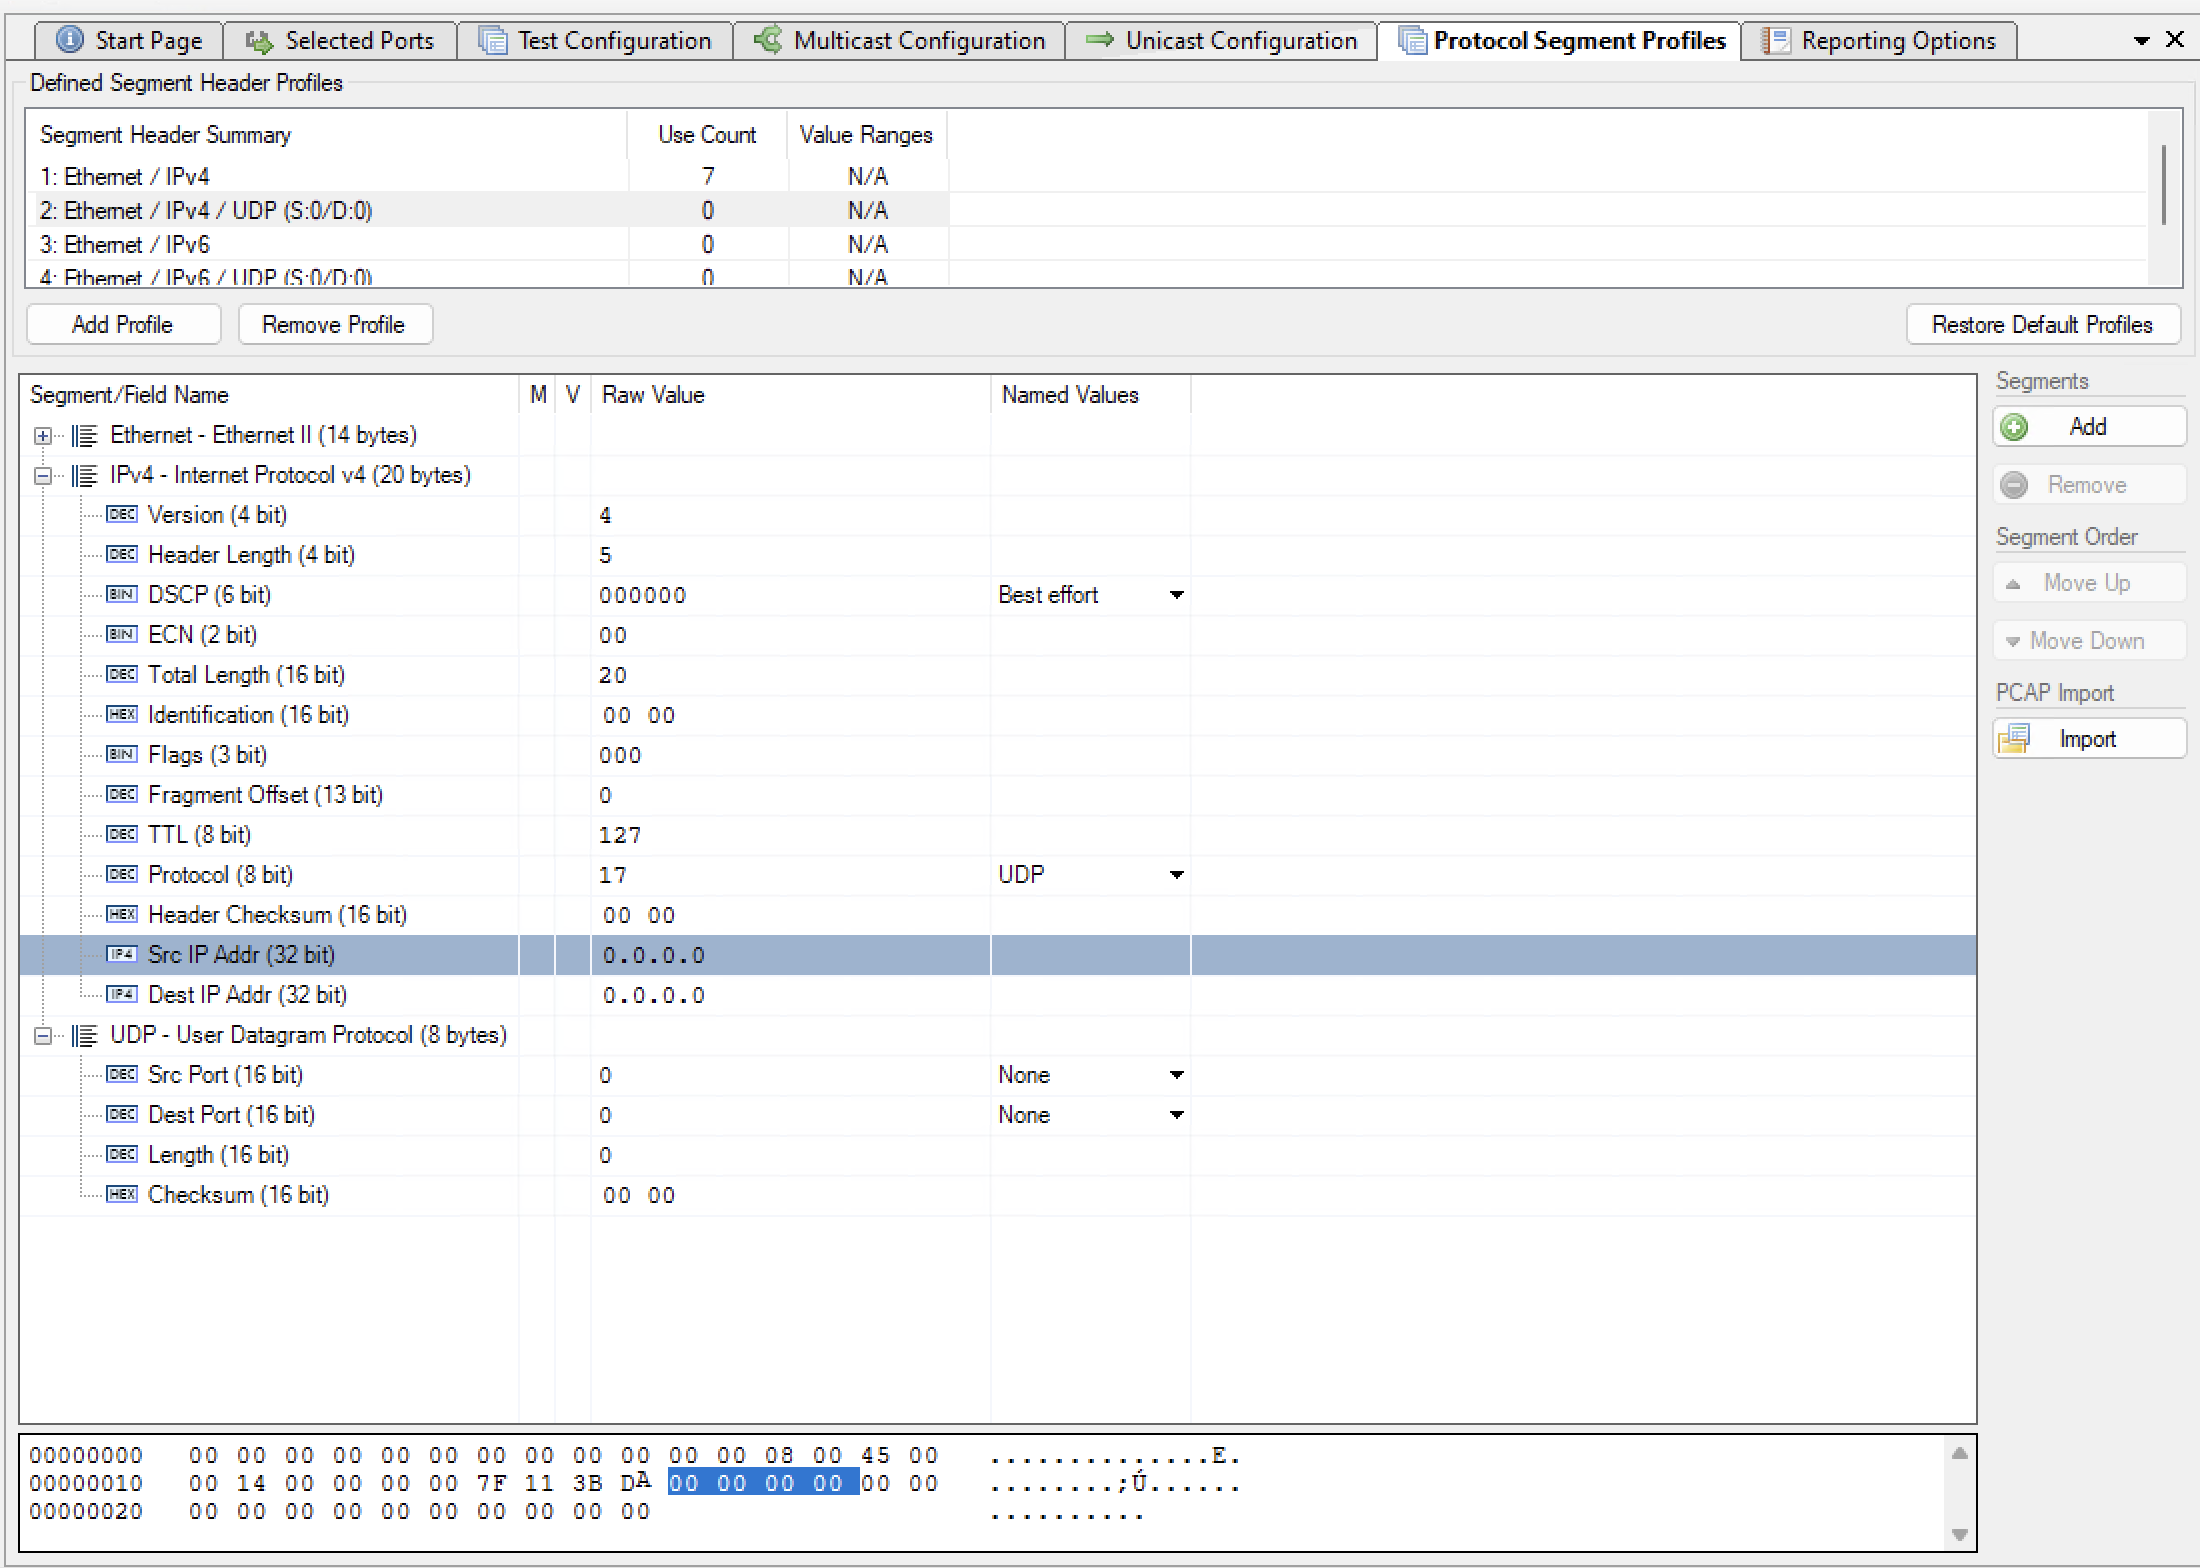
Fig. 11.1 Protocol segment profiles
Managing Profiles
You can create and delete profiles to match the need of the current test scenario. To create a new profile press the Add Profile button. To delete a profile select it in the list view and press the Remove Profile button.
You can however not delete a profile that is currently being used by a test port. You can see the number of test ports currently using a profile in the Use Count column in the list view at the top.To delete a profile that is in use you will first have to reassign all ports currently using that profile to another profile.
Default Profiles
When you create a new Xena3918 configuration it will be populated with a number of default profiles. You can however freely modify and even delete one or more of the default profiles.
If for some reason you want to restore the default profiles you can press the Restore Default Profiles button. This will unconditionally remove all current profiles (also those that are in use) and restore the default set. All test ports will be associated with the first default “Ethernet-only” profile.
11.2. Profile Editor
You can edit each profile by selecting it in the top list view and using the tree view control below.
Add and Remove Segment Headers
To add a new segment header press the Add button in the Segments section to the right. You will then be presented with a dialog listing all built-in segment types from which you can select one or more types to be included. If you want to use a segment not currently supported by the Xena3918 you can add a raw segment and specify the length in bytes. You can then afterwards edit the values in the resulting segment using the hex editor at the bottom.
You can remove one or more segments by selecting them and pressing the Remove button in the Segments section. You can change the order in which the segment headers appear by using the Move Up/Down buttons.
The Xena3918 will automatically adjust the value of any standard “”next-protocol” field (such as the EtherType field) in the segment headers when other segments are added, removed or moved.
Editing Field Values
The segment editor provides a tree view similar to the one found in the Wireshark protocol analyzer. You can thus expand each segment branch to view and optionally modify the various field values. Each field title is preceded with a small icon indicating the type of field value (decimal, hexadecimal, binary or IPv4/IPv6 address).
Certain fields, such as the EtherType, are associated with a set of commonly used named values. These can be selected in the Named Values column. You are however free to enter any value you want in the Raw Value column.
You can also edit the hex value of the segment headers directly using the hex editor at the bottom if you are so inclined.
MAC and IP Addresses
The address fields in the Ethernet and IP section headers will usually be overridden by the Xena3918 when the test streams are created:
The Source MAC (SMAC) address field in the first Ethernet segment will be set to the MAC address of the source port.
The Destination MAC (DMAC) address field in the first Ethernet segment will be set to the MAC address of the destination port. If an IP segment has been defined and a gateway IP address is defined for a source port, the Xena3918 will however attempt to resolve the MAC address of the gateway using ARP or NDP and wil then use this MAC address as the DMAC.
The IP Source/Destination Address fields in the IP segment header will be set to the values configured on the ports, as explained in the Selected Ports panel section above.
This replacement will however only be performed if you leave the fields at their default (all-zeros) value. If you specify anything else this value will be used instead.
11.3. Modifiers
It is possible to attach a modifier definition to one or more fields. A modifier will exercise the field with various values during the test and can be used to emulate a certain dynamic behavior. Modifiers are often used to exercise either the VLAN PCP or the IP DHCP fields. Alternatively one could apply modifiers to address fields like the DMAC field or the source or destination IP address fields.
Adding a Modifier
To add a modifier to a field simply select the field and press the Add Modifier button in the command panel to the right or right-click and select the Add Modifier popup menu option. A Create New Modifier dialog will now be shown. The content of the dialog will depend on the type of field. Most fields will use the Basic Modifier dialog shown below to the left. If the selected field is an IP address the IP Modifier dialog shown below to the right will be used instead.
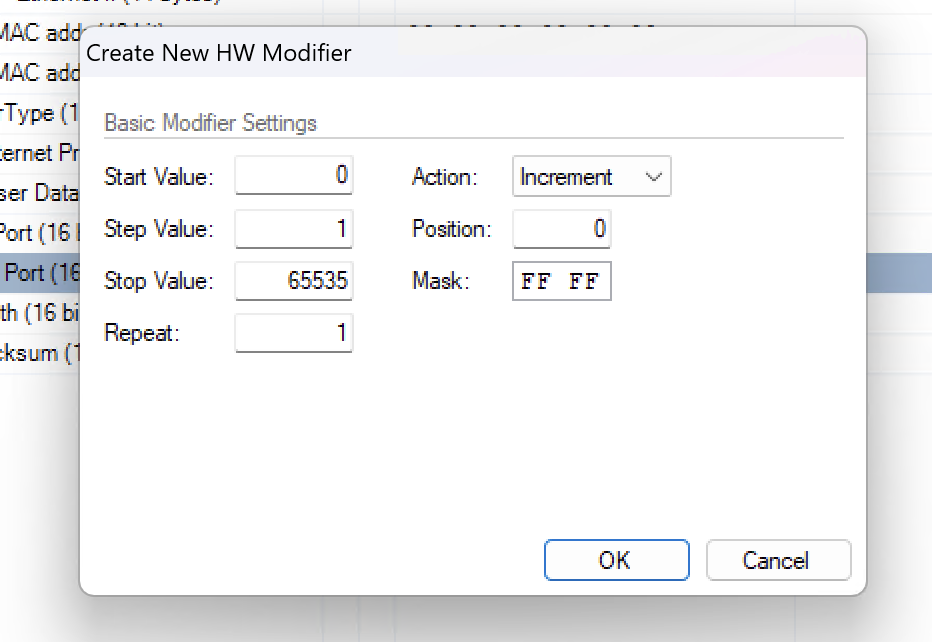
Fig. 11.2 Basic modifier
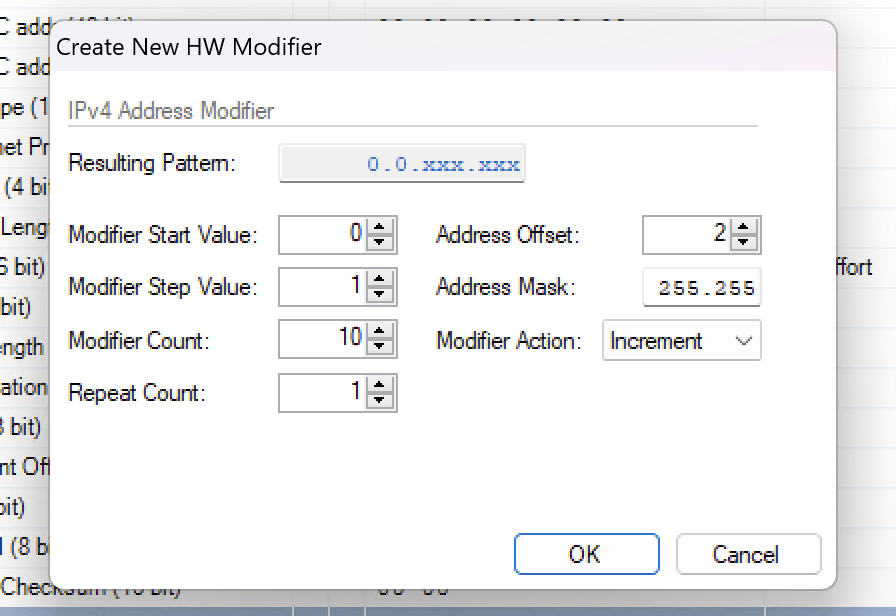
Fig. 11.3 IP modifier
Fill in the various field values and press the OK button to add the modifier to the field. Once a modifier has been added to a field this will be indicated by a small blue M icon as shown in the screenshot above.
Editing a Modifier
To edit an existing modifier either select the field and press the Edit Modifier button in the command panel to the right, or right-click and select the Edit Modifier popup menu option. You will see the same dialog as was used to create the modifier.
Removing a Modifier
If you want to remove a modifier from a field simply select the field and press the Remove Modifier button in the command panel to the right, or right-click and select the Remove Modifier popup menu option.
Limitations
There is a limitation on the maximum number of modifiers that can be defined for each test stream. The limitation is specific for the test module type to which the port belong. Refer to the Xena Test Module Comparison Page for further details.
11.4. Value Ranges
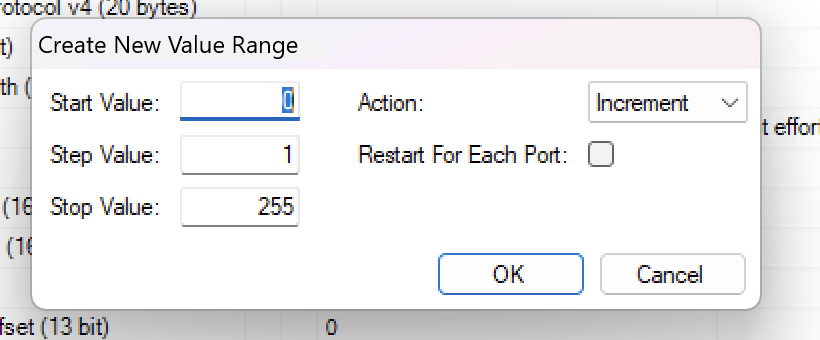
Fig. 11.4 Value Ranges
A Value Range is intended to exercise one or more fields in a Xena3918 protocol segment profiles with varying values. It is kind of similar to the hardware modifier explained above, with the following differences:
A Modifier is handled by hardware and varies a field value between packets on the same stream.
A Value Range is handled by software and varies a field value between different streams. All packets on the same stream have the same value.
A Value Range is defined on a field in a protocol segment profile, just like a modifier. It will then be used for all streams created on a port which is assigned this profile.
Value ranges can be used for both normal single-stream and advanced multi-stream scenarios. For normal scenarios it is most applicable for mesh configurations where multiple streams will be created on each port.
There is no limit to the number of values ranges added to a configuration. It is also possible to add both a modifier and a value range to a field. Whether that would yield usable results is unclear but it might be useful for larger fields.
11.5. PCAP Import
You can import the protocol segment structure from a PCAP file captured using Wireshark or any other capture application capable of generating a standard PCAP file. If the file contains multiple packets Xena3918 will display a list allowing you to select the desired packet.
Xena3918 will attempt to decode the packet and display the known protocol headers and their fields. Any unknown fields will be displayed as a raw segment. As there are limitations in the max.size of a custom segment the import may not be possible in some cases. The import dialog will inform you about this if the situation arises.